ShopDreamUp AI ArtDreamUp
Deviation Actions


Suggested Deviants


![[6K AI ART] I'm waiting for my boyfriend](https://images-wixmp-ed30a86b8c4ca887773594c2.wixmp.com/f/ff6a1029-1c57-4dbe-b2b6-316ac012a690/dgpvdns-652afc29-8224-4700-8416-b7c80ca8266b.png/v1/crop/w_92,h_92,x_12,y_0,scl_0.092,q_70,strp/_6k_ai_art__i_m_waiting_for_my_boyfriend_by_fhlstudio_dgpvdns-92s.jpg?token=eyJ0eXAiOiJKV1QiLCJhbGciOiJIUzI1NiJ9.eyJzdWIiOiJ1cm46YXBwOjdlMGQxODg5ODIyNjQzNzNhNWYwZDQxNWVhMGQyNmUwIiwiaXNzIjoidXJuOmFwcDo3ZTBkMTg4OTgyMjY0MzczYTVmMGQ0MTVlYTBkMjZlMCIsIm9iaiI6W1t7ImhlaWdodCI6Ijw9ODU0IiwicGF0aCI6IlwvZlwvZmY2YTEwMjktMWM1Ny00ZGJlLWIyYjYtMzE2YWMwMTJhNjkwXC9kZ3B2ZG5zLTY1MmFmYzI5LTgyMjQtNDcwMC04NDE2LWI3YzgwY2E4MjY2Yi5wbmciLCJ3aWR0aCI6Ijw9MTI4MCJ9XV0sImF1ZCI6WyJ1cm46c2VydmljZTppbWFnZS5vcGVyYXRpb25zIl19.qmuEddK1Qb_o3VsWD7ZBlYZlTZAd7opDXD3Kh_9Ohic)
![[6K AI ART] Girl wearing white t-shirt and jeans](https://images-wixmp-ed30a86b8c4ca887773594c2.wixmp.com/f/ff6a1029-1c57-4dbe-b2b6-316ac012a690/dglqgk6-09693c11-80b4-4d6b-9245-98e7a4284129.png/v1/crop/w_92,h_92,x_12,y_0,scl_0.092,q_70,strp/_6k_ai_art__girl_wearing_white_t_shirt_and_jeans_by_fhlstudio_dglqgk6-92s.jpg?token=eyJ0eXAiOiJKV1QiLCJhbGciOiJIUzI1NiJ9.eyJzdWIiOiJ1cm46YXBwOjdlMGQxODg5ODIyNjQzNzNhNWYwZDQxNWVhMGQyNmUwIiwiaXNzIjoidXJuOmFwcDo3ZTBkMTg4OTgyMjY0MzczYTVmMGQ0MTVlYTBkMjZlMCIsIm9iaiI6W1t7ImhlaWdodCI6Ijw9ODU0IiwicGF0aCI6IlwvZlwvZmY2YTEwMjktMWM1Ny00ZGJlLWIyYjYtMzE2YWMwMTJhNjkwXC9kZ2xxZ2s2LTA5NjkzYzExLTgwYjQtNGQ2Yi05MjQ1LTk4ZTdhNDI4NDEyOS5wbmciLCJ3aWR0aCI6Ijw9MTI4MCJ9XV0sImF1ZCI6WyJ1cm46c2VydmljZTppbWFnZS5vcGVyYXRpb25zIl19.pD-b3fz-OlXP2RwORxhlMqhggOx11Zj6E4BG7HHUf_U)
![[6K AI ART] Girl standing in the field](https://images-wixmp-ed30a86b8c4ca887773594c2.wixmp.com/f/ff6a1029-1c57-4dbe-b2b6-316ac012a690/dgl31v5-e3d194b6-1e63-4ed8-8d81-73a98e67a4f8.png/v1/crop/w_92,h_92,x_12,y_0,scl_0.092,q_70,strp/_6k_ai_art__girl_standing_in_the_field_by_fhlstudio_dgl31v5-92s.jpg?token=eyJ0eXAiOiJKV1QiLCJhbGciOiJIUzI1NiJ9.eyJzdWIiOiJ1cm46YXBwOjdlMGQxODg5ODIyNjQzNzNhNWYwZDQxNWVhMGQyNmUwIiwiaXNzIjoidXJuOmFwcDo3ZTBkMTg4OTgyMjY0MzczYTVmMGQ0MTVlYTBkMjZlMCIsIm9iaiI6W1t7ImhlaWdodCI6Ijw9ODU0IiwicGF0aCI6IlwvZlwvZmY2YTEwMjktMWM1Ny00ZGJlLWIyYjYtMzE2YWMwMTJhNjkwXC9kZ2wzMXY1LWUzZDE5NGI2LTFlNjMtNGVkOC04ZDgxLTczYTk4ZTY3YTRmOC5wbmciLCJ3aWR0aCI6Ijw9MTI4MCJ9XV0sImF1ZCI6WyJ1cm46c2VydmljZTppbWFnZS5vcGVyYXRpb25zIl19.FXVWIMEVHCVXTrXhqGrhKy7WIqLFimIPVcYrNRsx6pM)
Suggested Collections


You Might Like…


Featured in Groups


Description
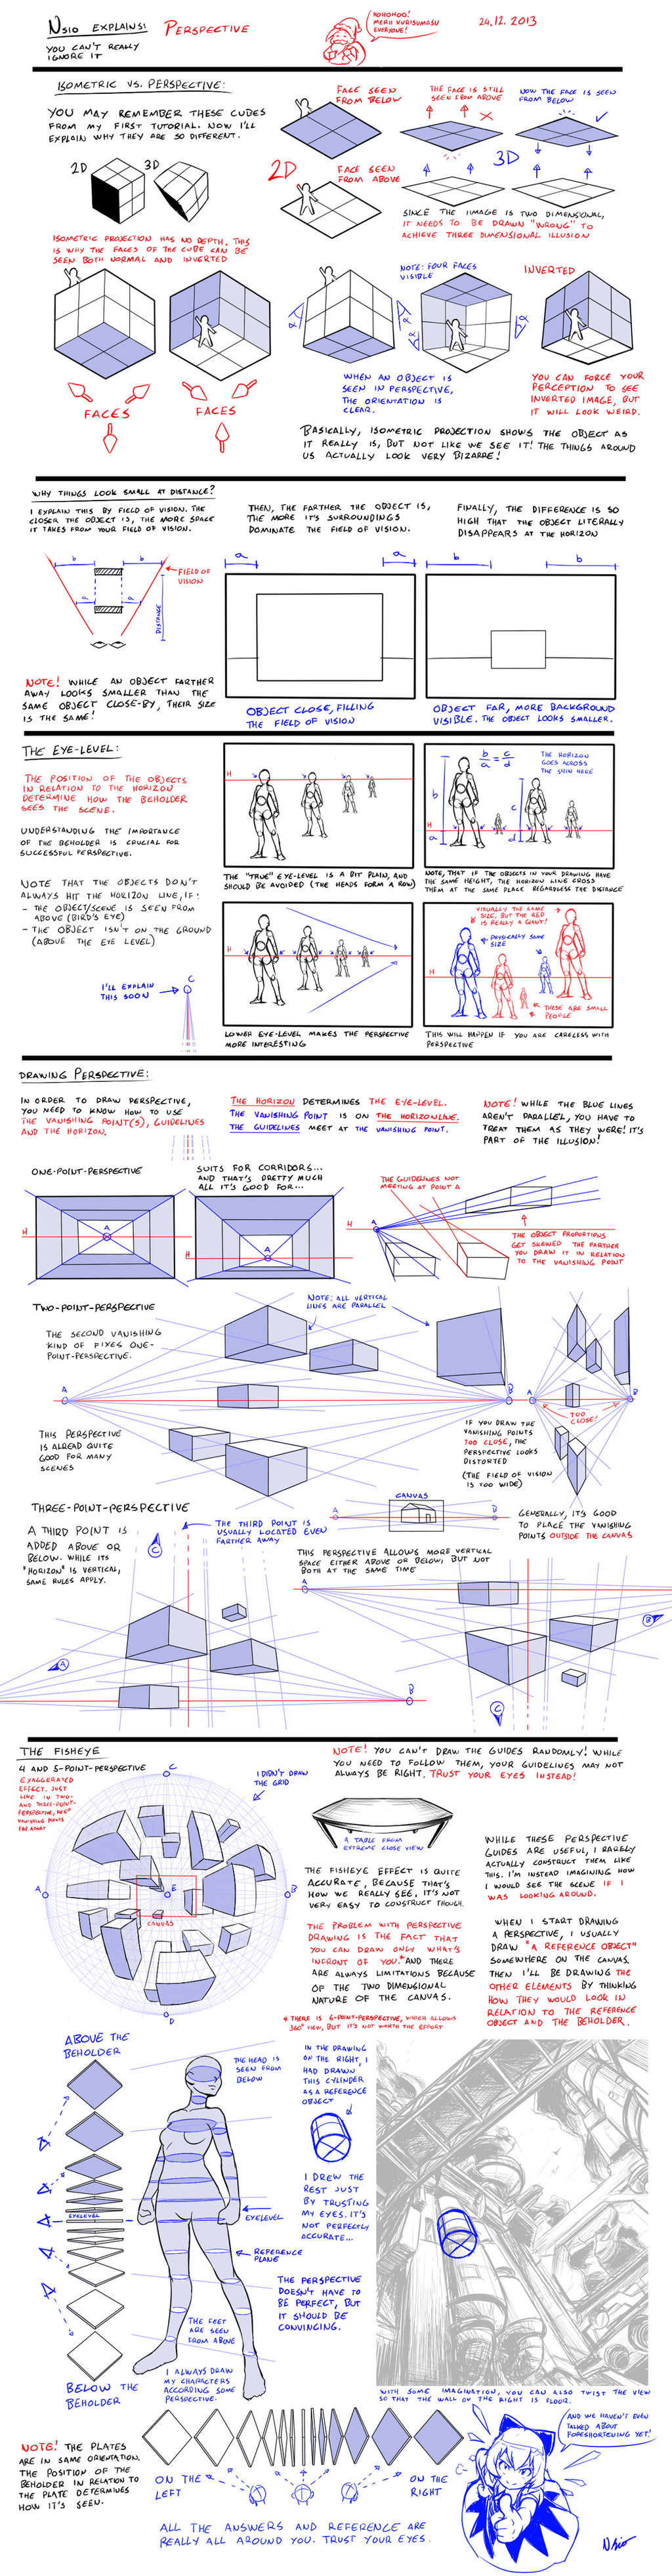
Seventh tutorial in my Nsio explains series. I'm finally talking a little about the infamous perspective. You can't really get away from it.
Consider this as my Christmas present to the dA community! ")
Isometric vs. perspective, 2D vs. 3D:
I guess everyone knows how to draw a cube at least to some extent. The question is whether that cube has successful depiction of three dimensional illusion.
I, for one, drew a lot of cubes in isometric projection and I thought it was three dimensional. But it's not. In fact, it looks very weird, if you think about it. You may look at this example as well: dsearls.org/courses/C122CompSc… . In orthogonal projections, the sides of the cube are always parallel. And in a sense, it's right, the sides of the cube needs to be parallel so that it would be a cube. However, the sides aren't parallel at all in perspective drawing. The cube is skewed, but for us, it looks even more like a cube than before.
Our brains won't bother processing this skewed look around us, because it doesn't have to. You simply know that thing which actually looks skewed is a cube with right angles and straight sides. That said, you don't probably even realize how weird and distorted the world looks around yourself. And when you attempt to draw a cube, you might draw an isometric projection of it and call it 3D, because that's how it really is right? Well, while it's true, it's not what we actually see when we look at a cube in three dimensional space. So in order to draw a successful illusion of three dimensions, you have to draw the cube "wrong" in order to make it look like how we would see it in reality.
I understand the difference between 2D and 3D as I have drawn in my examples. If the cube drawing is truly 3D, there shouldn't be any doubt about the orientation of it's faces. However, if you draw and isometric cube, there are two possibilities: there is either normal cube or inverted cube. The faces of the cube can either face outwards or inwards. You can force your mind to see an inverted image of three dimensional cube, but if you can do that, you will see something totally weird and your brains can't probably comprehend what it is seeing. When I do this, I see the cube "inflating" back to normal the moment I see it inverted.
As a big fan of optical illusions, I suggest looking at this illusion too: www.lhup.edu/~dsimanek/3d/stai… . Pay attention how the guy is sitting on the stairs.
Why things look small at distance?
Because they are far away? True, but I have a bit different way to approach this question. I understand this phenomenon trough field of vision. You see, you could consider that our eyes are the point of a hollow cone and the field of vision expands as the cone gets larger. When you look very far, the cone has extended very far too. Now, if you place a wall right in front of you, your field of vision can't accommodate that wall, so it appears very large and you can't see anything else. If you step back, you eventually begin to see the surroundings around the wall. The wall appears to have shrunk before your eyes. If you keep walking backwards, the portion of the surrounding get larger in comparison to the wall. Finally, the difference between the surroundings and the wall that fill your field of vision is so great, that the wall basically disappears from your view. And despite becoming so small that it's hardly visible, it's size is still the same.
They Eye-level:
(You may know the term of horizon. It's good to note that when we talk about horizon in perspective, it's not necessarily the same as the physical horizon!)
When you are about to draw a perspective, you need to decide where the intended beholder is located and where she is looking at. The horizon of the perspective determines the eye-level. Then the position of the objects in relation to the horizon determine how the beholder sees the scene. For example, if the beholder's eyes are close to the ground, the objects dominate the topside of the horizon and usually the horizon is placed rather low on the canvas (the position of the horizon on the canvas doesn't really matter, but if you are going to draw a lot of sky, you will want to draw it rather low to actually be able to show the sky).
It's good to note that when a person (or any object) farther away and a person (or any object) with same height are seen at the same time, the horizon cross them exactly at the same place. That said, if you draw a person so that the horizon line crosses him around the chest, then all persons with the same height farther away also have the horizon line around their chest. When you have persons with different heights, then it will get a bit trickier, but it's still can be done by following the same principles. Be careful when you place people in perspective. Failing to follow the rules will result in rather interesting effects. The same person may appear as a dwarf or a giant depending on how you draw him in relation to the horizon!
Drawing Perspective:
In order to draw a successful perspective, you will need to know how the things get skewed according the perspective. For that, you will need to know how to use the horizon, vanishing point(s) and perspective guidelines. When you are drawing perspective, you will use these tools to construct convincing perspective. (Note, I'm not going to explain how to actually construct a perspective, but rather explain the idea behind the perspective).
To put it short:
1)The horizon line determines the eye-level
2)The vanishing point is located on the horizon line (as the name suggest, things disappear at the vanishing points, just like I told about the field of vision earlier).
3)The guidelines meet at the vanishing point (These determine the direction towards the vanishing points, so that you know how to skew your drawing).
one-point-perspective:
As the name suggests, there is only one vanishing point in this perspective. It's most often located directly in front of the beholder. This kind of perspective suits mostly on indoor corridors or in some street views. But in general, this perspective is rather limited: the farther you go from the vanishing point in any direction, the perspective becomes distorted. Note, that all vertical and horizontal lines are parallel, only the lines going towards the vanishing points aren't.
two-point-perspective:
This perspective kind of fixes the issue mentioned in one-point-perspective. Now there are two vanishing points and only vertical lines are parallel. This kind of perspective is pretty useful for many scenes already. The higher or lower you go from the horizon, the more distorted the drawing becomes.
Placing the vanishing points too close to each other is the most common perspective mistake. If you are drawing a house on A4 paper, the vanishing points are far outside the paper boundaries. If you draw the vanishing point within the paper, you respectively need to draw the object in perspective smaller.
three-point-perspective:
Third vanishing point isn't added on the horizon, but above or below instead. Now none of the lines are parallel. This eliminates the distortion in vertical axis to some extent. This perspective allows the beholder gaze up to the sky or downwards. Note that you can't get both, because the perspective guidelines will cause the tremendous distortion the farther you go from the third vanishing point.
The third vanishing point is often placed very far from the horizon. The farther it is from the horizon, the more subtle the vertical skewing is.
The Fisheye perspective:
All the three methods thus far make use of straight lines. When fourth and fifth vanishing points are introduced, there are no longer straight lines. This is due to fisheye effect taking place which causes all the lines curve. This is pretty tricky to construct, but that's very close to how we actually see the things around us (www.2d-digital-art-guide.com/m… this is where I grabbed the spherical perspective grid).
The problem with perspective drawing is the fact that you can only draw what's in front of you. In perspective drawings, the beholders view is sort of "locked" so you can't look what's on the left or right . There is six-point perspective, where the sixth vanishing point is located behind the beholder and it's possible to draw 360 degree view of the scene. This is already getting so ridiculous, that it's not really worth the trouble. Besides, I believe it's possible to draw perspective close enough without constructing the perspective. Even though I'm saying this, it's still crucial to know how the things I have explained work in order to draw the perspective right.
When I draw perspective, I rarely really construct them. Instead, I'm imagining how I would see the scene around me if I was to look around. Remember, that you can't draw the guidelines randomly in any perspective. You will still need to know how the objects looks from certain point of view. That said, I'm trusting more my own eyes and use the guidelines only when I really need them.
So to get started with a perspective drawing, I usually draw some sort of reference object first. I'm not really thinking the angle at this point, I'm just drawing an object that looks three dimensional. When I have drawn this object, I will begin to "look around" the canvas. I'm trying to see the "where" I had drawn the reference object in relation to the beholder. And that's how I keep working on the drawing, finding the relations between the elements according to the reference object and the beholder. I may still use the guidelines every now and then, but mostly I'm just trying trust my understanding of how I will see the objects around me.
Same goes with basically anything I draw. When I draw human characters, I usually draw them as if they were rather close to the beholder. That's why the feet are seen from above. And if they eye-level is around the waist, then the head is seen from below. It's also good way to show the height of the character in relation to the beholder, as shorter characters need to look upwards and taller characters downwards in order to look the beholder's face. This then can be used in manga to help the reader feel like she was part of the story.
Foreshortening has a lot to do with the perspective, but I decided to leave it out for now.
Image size
1277x4895px 2.36 MB
© 2013 - 2024 Nsio
Comments155
Join the community to add your comment. Already a deviant? Log In
Thank you for providing these materials. May I request your permission to use them for our upcoming class discussion? Your assistance is greatly appreciated. Thank you.